switch |
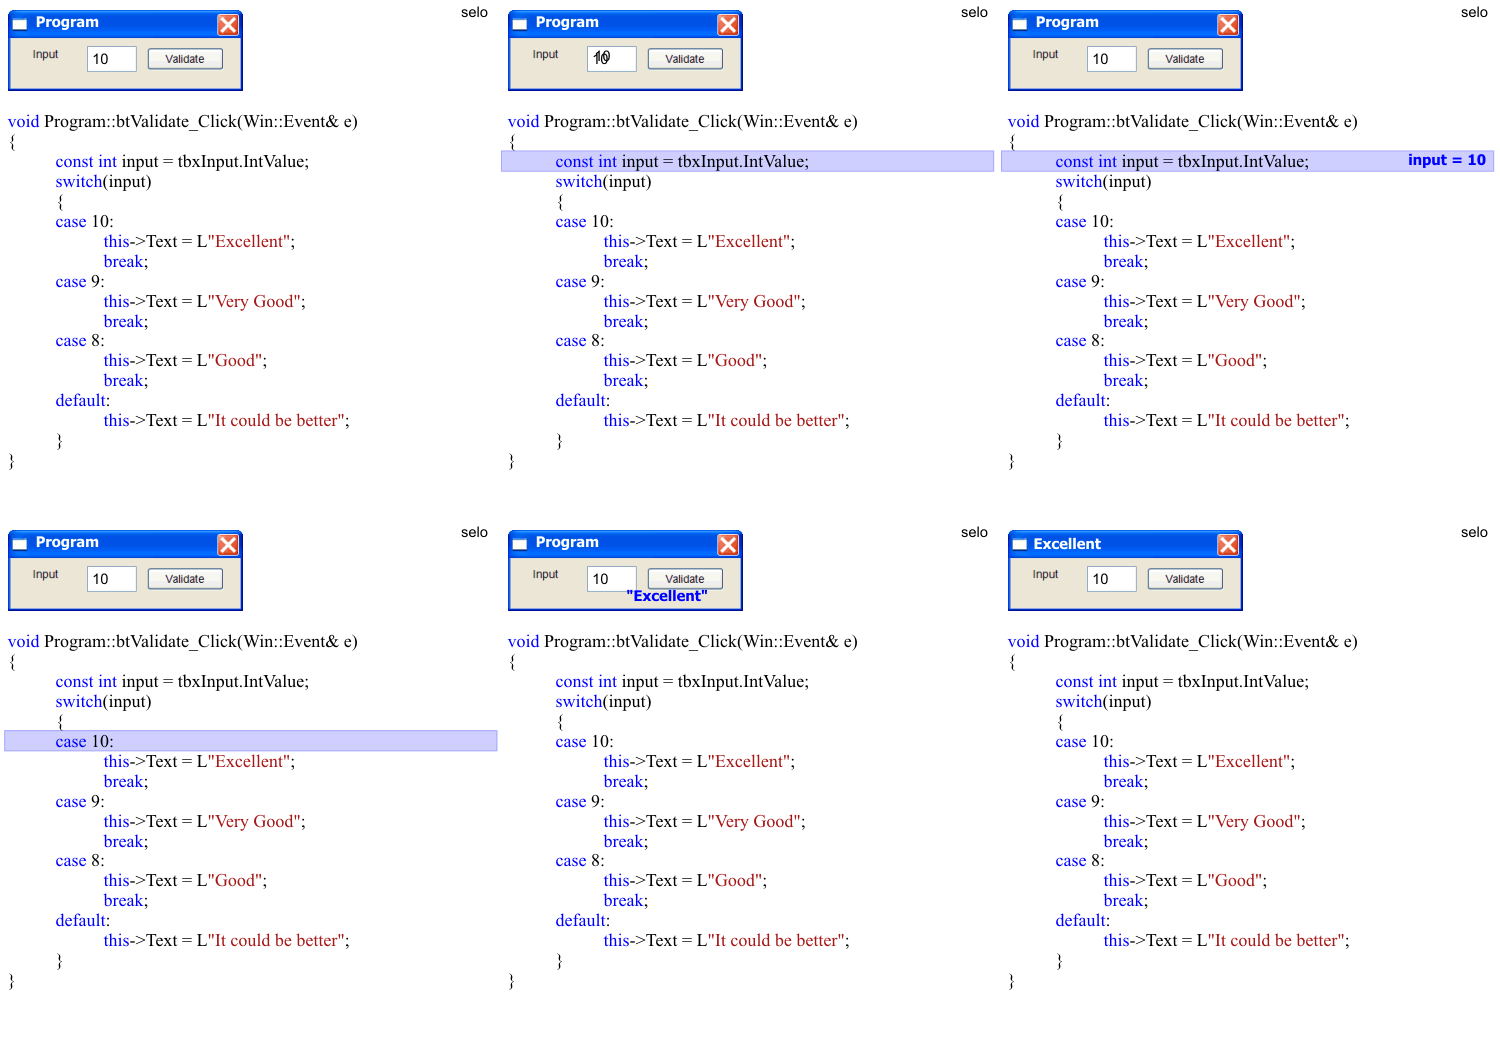
| When it is required to make several comparisons to choose the execution of a group of instructions from several options, it is possible to use several ifs, but the instruction switch is more efficient because it was designed for this purpose. This instruction works like this: the value of a variable (int, wchar_t or char) is successively tested against a list of integer or character constants. When a match is found, the group of instructions associated with that match is executed. The figures below how illustrate how the instruction switch works. In the first case, the user inputs a grade of 10, and the window title (text) is set to "Excellent". Cuando se desean hacer varias comparaciones para escoger un grupo de instrucciones ha ejecutar sobre varias opciones se puede usar un conjunto de ifs pero la instrucción switch es más eficiente ya que está diseñada para este propósito. Esta instrucción opera así: el valor de una variable (int, wchar_t or char) es sucesivamente comparado contra una lista de enteros o letras. Cuando se encuentra el valor respectivo de la variable, el grupo de instrucciones asociado con éste es ejecutado. Las figuras de abajo ilustran como opera la instrucción switch. En el primer caso, el usuario proporciona una calificación de 10 y el título de la ventana (su texto) es fijado en "Excellent". |

| Tip |
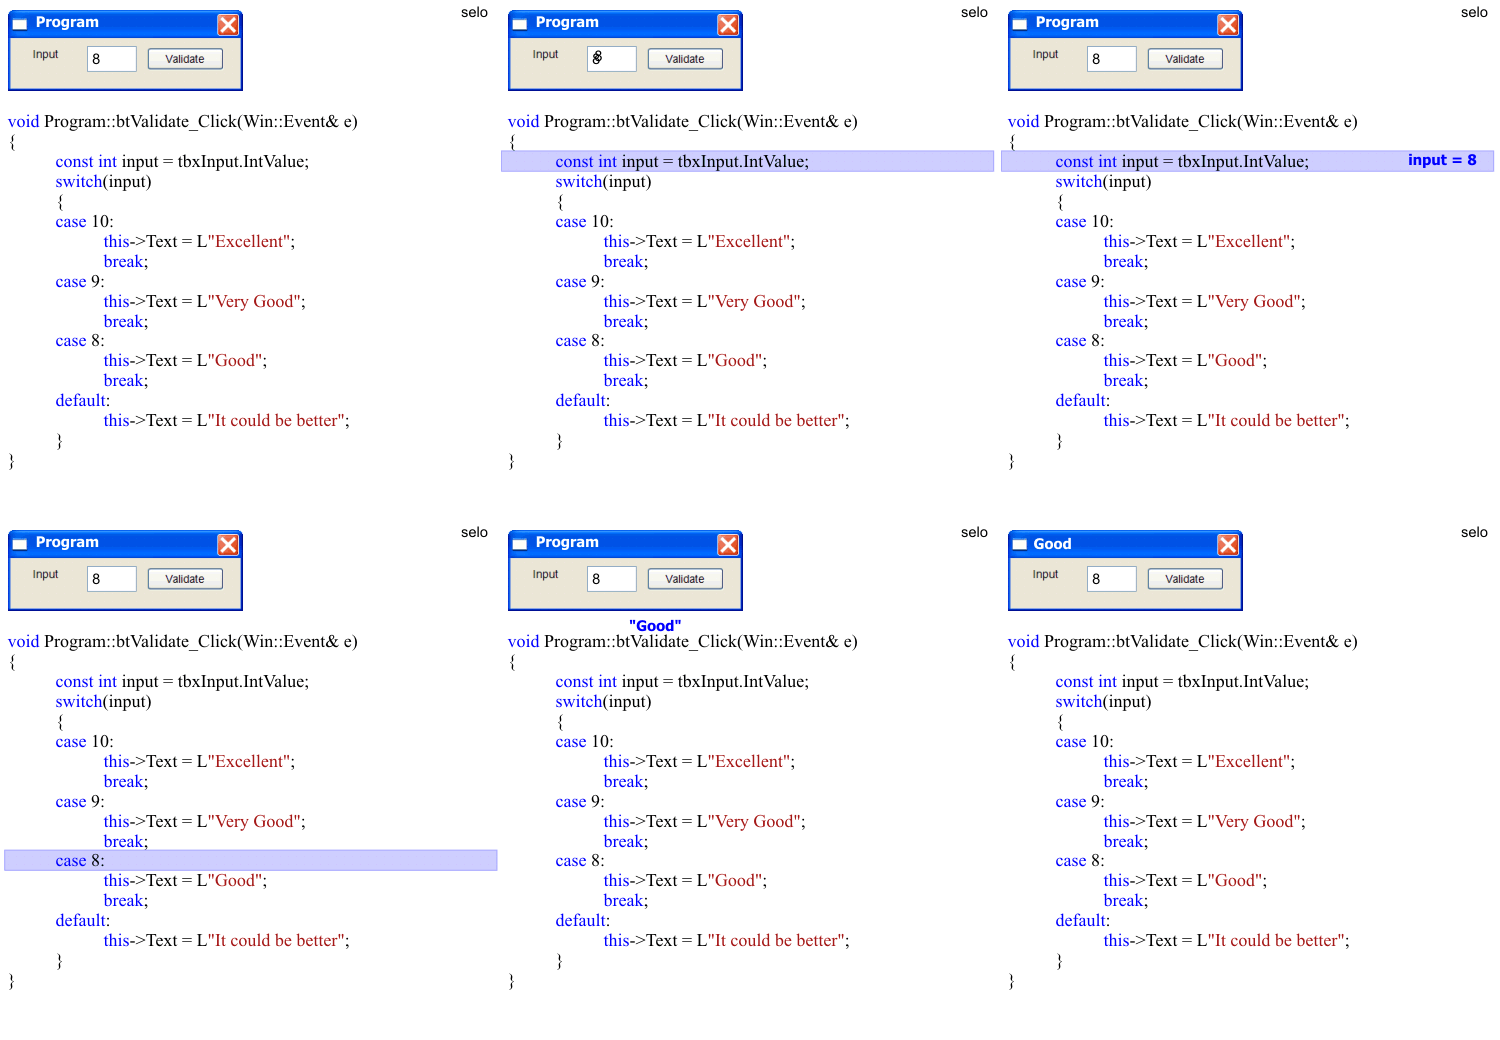
| In the figure below, the user inputs a value of 8, and the window text is set to "Good". En la figura de abajo, el usuario escribe un valor de 8 y el texto de la ventana se fija en "Good". |

| Tip |
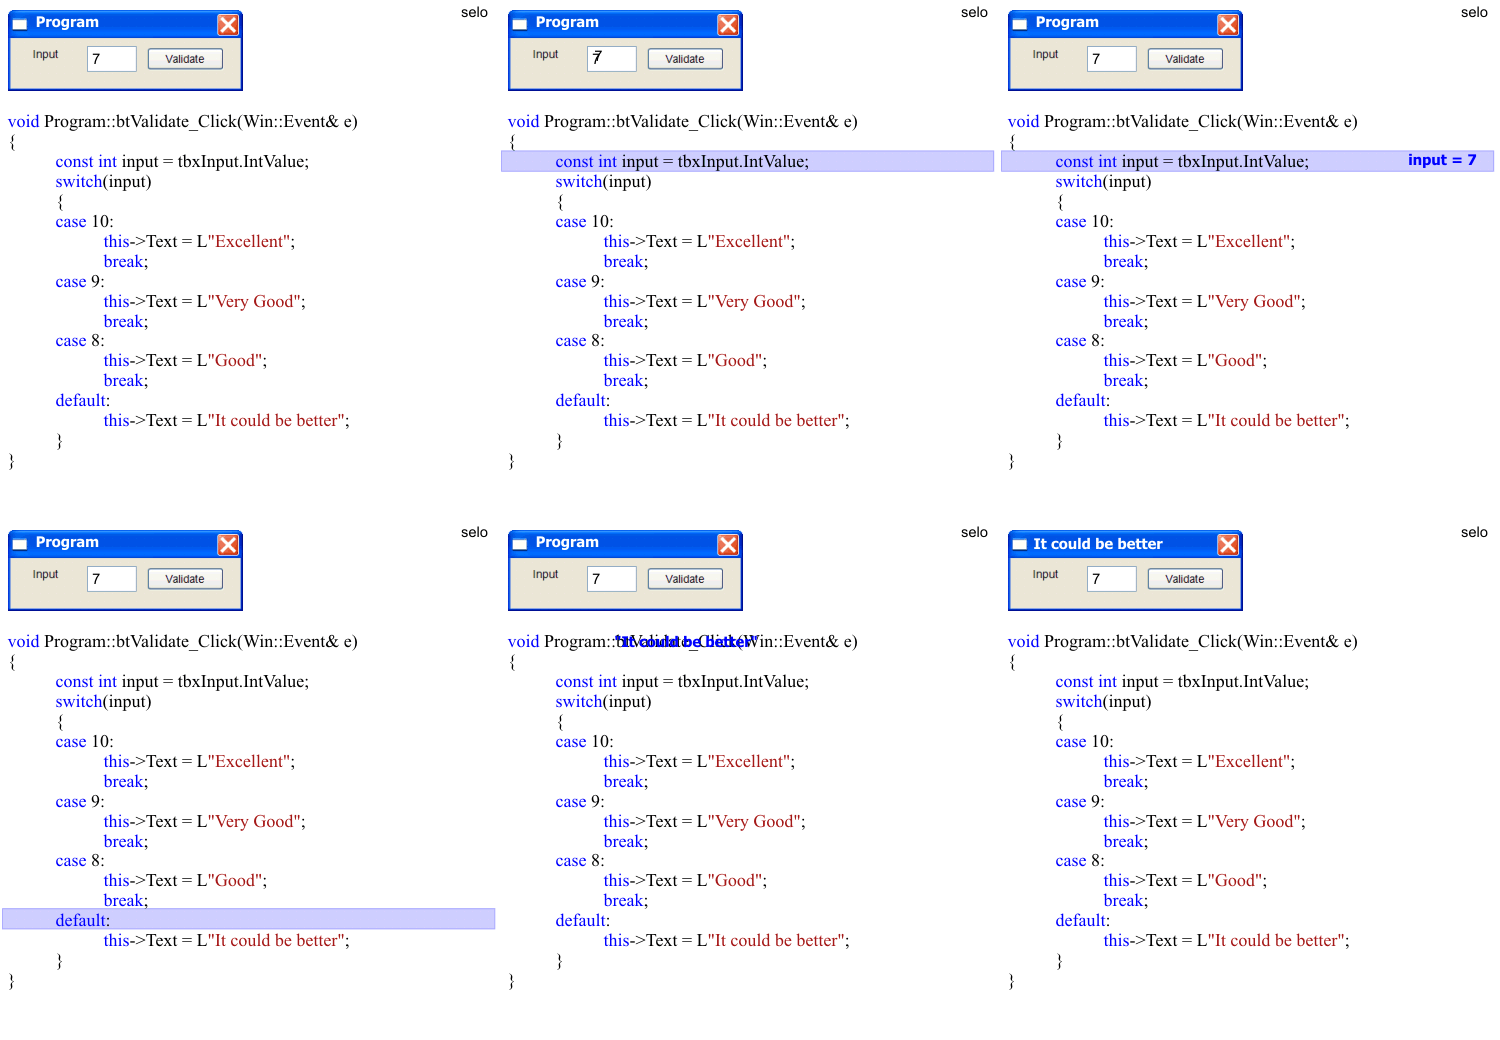
| In the figure below, the user inputs a grade of 7; which is not included in any of the cases. For this case, the instruction switch will execute the list of instructions after are located after the instruction default, as it is shown in the figure. Specifically, the window text is set to "It could be better". En la figura de abajo, el usuario proporciona una calificación de 7; la cual no es incluida en ninguno de los casos. Para este caso, la instrucción switch ejecutará la lista de instrucciones que están después de la instrucción default como se muestra. Específicamente el texto de la ventana se fijará en "It could be better" que quiere decir "Podría ser mejor" en español. |

| Tip |
| The instruction switch can be replaced by the instruction if as shown in the code below. However, it can be mention that the instruction switch is more efficient than the instruction if when program requires several options. La instrucción switch puede ser reemplazada por la instrucción if como se muestra en el código de abajo. Sin embargo, se puede mencionar que la instrucción switch es más eficiente que la instrucción if cuando el programa requiere de varias opciones. |
| Program.cpp |
| void Program::btValidate_Click(Win::Event& e) { const int input = tbxInput.IntValue; if (input == 10) { this->Text = L"Excellent"; } else if (input == 9) { this->Text = L"Very Good"; } else if (input == 8) { this->Text = L"Good"; } else { this->Text = L"It could be better"; } } |
default |
| The default statement sequence is performed if no matches are found. The instruction default is optional; if it is not present, no action takes if all matches fail. This instruction is equivalent to a consolation prize that you get, when none of the options matches the value of the variable. In the previous code, the variable called name will be assigned the value of It could be better for any input different from: 8, 9 or 10. La instrucción de default se ejecuta solamente si no se encuentra ninguna opción dentro de los casos que sea válida. La instrucción default es opcional; si no se encuentra presente, ninguna instrucción se ejecuta si no se cumplen ninguno de los casos. Es equivalente al premio de consolación que es recibido cuando no se cumple ninguna de las opciones proporcionadas en los cases. En el código previo, a la variable llamada name se le asignará el valor de It could be better para cualquier entrada diferente de: 8, 9 o 10. |
| Tip |
| When the variable in the instruction switch matches one of the values in the case, the associated instructions with the case will execute until the instruction break is found. The instruction break is optional, but in most cases this instruction is used. When a break is encountered within the list of instructions of a case, the instruction break causes program flow to exit from the entire switch block and resume at the next instruction outside the switch. However, if an instruction break is not found, then all the instructions below the matching case will be executed until a break or the end of the switch is encountered. Cuando la variable en la instrucción switch es igual a uno de los valores en los casos, las instrucciones asociadas a este caso se ejecutarán hasta que la instrucción break se encuentre. La instrucción break es opcional, pero en la mayoría de los casos ésta instrucción es usada. Cuando un break se encuentra dentro de la lista de instrucciones de un case, la instrucción break obligará al programa a salir por completo del bloque switch y continuar la ejecución de la próxima instrucción afuera de la instrucción switch. Sin embargo, si una instrucción break no está presente, entonces todas las instrucciones debajo del case que es igual se ejecutarán hasta que se encuentre un break o el final del switch. |
| Problem 1 |
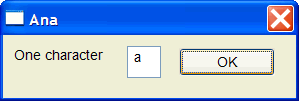
| Create a program called Shortcut, the user types a letter and when he presses the OK button the name of person is display in the window title. Cree un programa llamado Shortcut, el usuario escribe una letra y cuando el presiona el botón de OK el nombre de la persona es mostrado en el título de la ventana. |
| Shortcut.cpp |
| void Program::btOK_Click(Win::Event& e) { wchar_t c = tbxInput.Text[0]; switch(c) { case L'a': this->Text = L"Ana"; break; case L'b': this->Text = L"Bob"; break; case L'd': this->Text = L"Daniel"; break; case L'f': this->Text = L"Fred"; break; case L's': this->Text = L"Sam"; break; case L't': this->Text = L"Tom"; break; case L'z': this->Text = L"Zoe"; break; default: this->Text = L"Error"; } } |

| Problem 2 |
| Compute the table of variables and the output of the code shown. Suppose there is a textbox called tbx1 with the property of multiline. Test your program with different values for the variable "option": 0, 1, 2, 3, 4. Calcule la tabla de variables y la salida del código de abajo. Suponga que hay una caja de texto llamada tbx1 con la propiedad de multilínea. Pruebe su programa con valores diferentes para la variable "option": 0, 1, 2, 3, 4. |
| Program.cpp |
| void Programa::Window_Open(Win::Event& e) { int option=2; switch(option) { case 0: tbx1.Text += L"Juan"; break; case 1: tbx1.Text += L"Ivan"; break; case 2: tbx1.Text += L"Julio"; break; default: tbx1.Text += L"Petra"; } tbx1.Text += L" es inteligente"; } |
| Problem 3 |
| Create a program called Nohemi to test the code below. After creating the project insert a textbox called tbxOutput. Cree un programa llamado Nohemi para probar el código de abajo. Después de crear el proyecto, inserte una caja de texto llamada tbxOutput. |
| Nohemi.cpp |
| void Nohemi::Window_Open(Win::Event& e) { int i = 0; for(i = 0; i < 3; i++) { switch(i) { case 0: tbx1.Text += L"A-"; case 1: tbx1.Text += L"B-"; case 2: tbx1.Text += L"C-"; default: tbx1.Text += L"D-"; } } } |